


A proxy-to-profile integration means binding one network route to one isolated browser environment. It is used to keep account sessions separate and make the profile location consistent with the selected IP. In real workflows, the main risks are unsupported IPv6 routes, incorrect credentials, and a mismatch between the proxy country and browser signals.
Those failures are easier to catch when the network route is tested before the account is opened. Afina Browser’s proxy manager accepts HTTP, HTTPS, and SOCKS5 IPv4 proxies, checks the connection, and shows the detected outgoing IP. Afina does not currently support IPv6 proxies, so choose an IPv4 product in IPNut for this integration.
A working proxy is only one part of the profile. If its country points to one location while the time zone, language, or device configuration points elsewhere, the environment becomes internally inconsistent. Afina provides separate fingerprint management controls for these browser-side signals, so the final check should cover both the route and the profile.
What this integration combines
IPNut supplies the proxy endpoint and credentials. Afina stores that endpoint inside a browser profile, checks the route, and keeps cookies, cache, and profile settings separate from other sessions. The practical rule is simple: obtain a complete IPv4 proxy record first, then configure the browser profile around that route.
The two layers solve different problems and should be reviewed separately.
| Layer | What it controls | What to verify |
|---|---|---|
| IPNut proxy | External IP, protocol, country or region, credentials | IPv4 endpoint, active order, host, port, login, password |
| Afina profile | Browser fingerprint, cookies, time zone, language, launch rules | Proxy check, outgoing IP, signal consistency, stable session |
This distinction matters during troubleshooting. A failed proxy check points to the network or credentials. A successful check followed by an account challenge may indicate a profile, location, or session-consistency problem.
Step 1: proxy purchase process
All IPNut proxy services require an overseas network environment; this tutorial assumes operation under such conditions.
To use IPNut’s IP services, users must first purchase proxy ports.
Payment methods: Alipay, WeChat Pay, or Credit Card (contact staff for alternative payment options). Account top-up is required if the balance is insufficient, via Alipay, WeChat, or Credit Card.
Support channels: Telegram @Jennyipnut, or the contact details listed on the official IPNut website for any other assistance.
Account setup and proxy purchase
-
Register an account. Create your IPNut account via email, phone, or a Google account.
-
Log in to the platform. Visit ipnut.com and log in using email, phone, or Google.
-
Access the control panel. New users can request free trials by contacting customer service.
-
Purchase proxy ports. Select proxy parameters according to your needs: proxy type, country or region, IP validity period, and quantity. Example path: Products → Static Datacenter Proxy-IPv4 → Purchase.
-
Confirm the order. Review order details in the right panel and click “Buy now”.
-
Wait for order processing. After successful payment, the order status shows Processing (5 to 10 minutes typical), then the order appears in your proxy order list.
-
Access the proxy details. The proxy address follows the structure protocol, username, password, IP, port, and region remark, for example:
socks5://account:password@127.0.0.1:12001#kr-seoulhttp://account:password@127.0.0.1:13001#kr-seoul
Extract the protocol, IP, and port components as required by your proxy software.
This completes the IPNut proxy purchase process.
Step 2: Configure the IPNut proxy in Afina Browser
Do not copy the full sample string into a single field. Separate it into protocol, host, port, username, and password. The region remark after # is useful as a label, but it is not part of the authentication password.
1. Create a dedicated browser profile
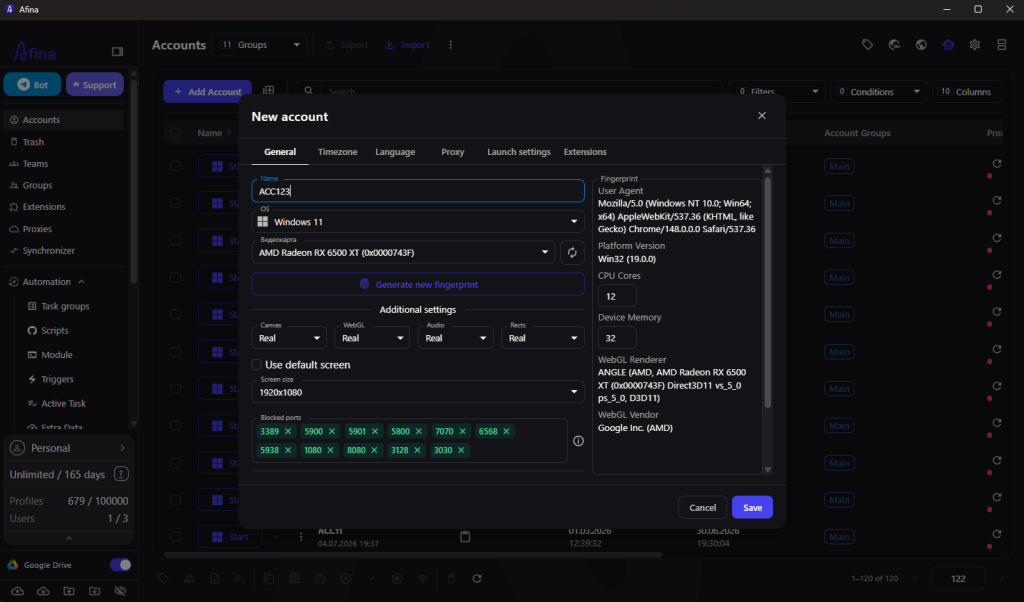
Open Accounts and select Add Account. Give the profile a name that identifies its task rather than exposing credentials. Choose the operating system and generate a fingerprint that is compatible with the computer running Afina.
The new profile window also contains tabs for Timezone, Language, Proxy, and Extensions. Configure the network first, then align the remaining signals with the detected route.
Avoid extreme randomization. A coherent profile is more useful than a collection of unusual values. Keep the operating system and User-Agent consistent with the host device, and change only the fingerprint components your workflow actually requires.
2. Enter the IPNut proxy credentials
Open the Proxy tab and select Set proxy. Choose HTTP, HTTPS, or SOCKS5 to match the IPNut record. Enter the host or IP address, port, login, and password in their corresponding fields. Use Remark for a readable label such as provider, country, project, or renewal date.
If IPNut provides a Change IP URL for a rotating product, place it only in the dedicated Change IP URL field. Static IPNut endpoints do not need a rotation link. Afina currently accepts IPv4 routes only, so an IPNut static residential IPv6 or datacenter IPv6 endpoint will not work in this setup.
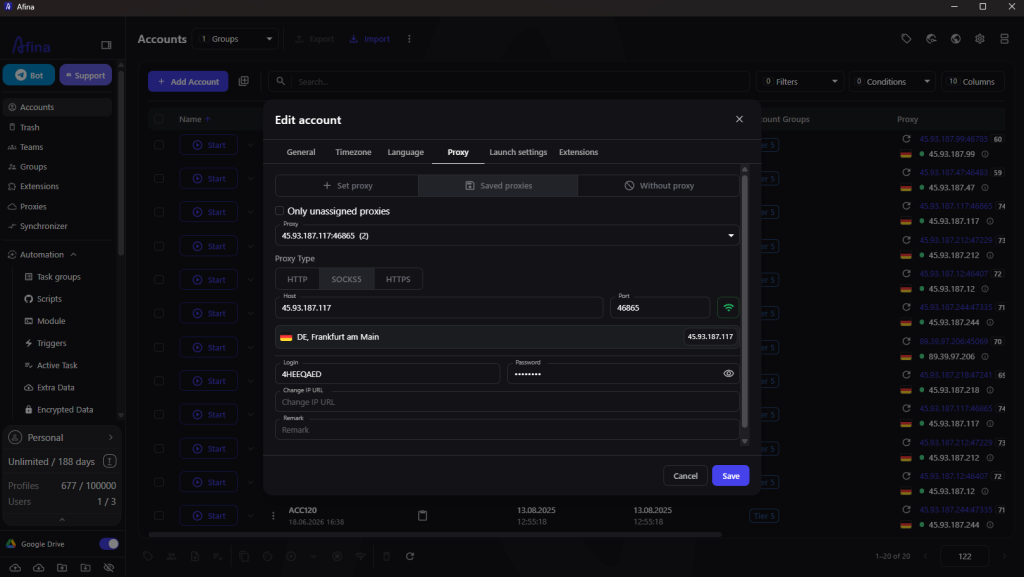
Click the proxy check control before saving. A valid result should show the detected country and outgoing IP. If the check fails, re-enter the credentials manually and confirm that the order is active before changing fingerprint settings.
3. Align time zone and language with the route
Keep Timezone from IP enabled unless the project requires a documented manual value. In the Language tab, Languages from IP can align browser language headers with the proxy location. Manual settings are possible, but they should describe the same operating context as the selected IP.
For a stable IP, avoid changing these values between launches. For a rotating endpoint, decide whether the session may cross countries. If it must stay within one country, use an appropriate provider-side selection and set Block on proxy country change to the rule required by the project.
4. Save, launch, and inspect the profile
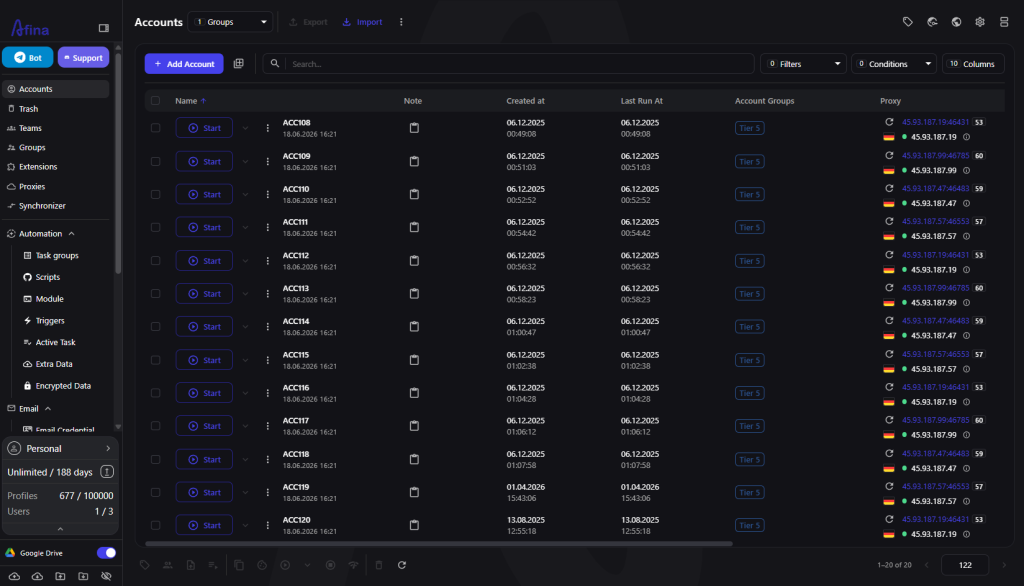
Save the account and return to the Accounts table. The proxy column lets you see which route is attached to each profile. This view is useful when several IPNut endpoints are distributed across projects because accidental proxy reuse becomes visible before launch.
The Afina profile manager keeps profile records, groups, tags, and proxy assignments in one place. Open the new profile only after the proxy check succeeds.
After launch, confirm that the browser reports the same public IP and country shown by the Afina check. If the workflow uses WebRTC, verify it separately. SOCKS5 with genuine UDP support is required for WebRTC, QUIC/HTTP3, and WebTransport routing. If those functions are unnecessary, disabling WebRTC is the simpler policy.
Verification checklist and common fixes
A successful configuration is a repeatable state, not a single green indicator. Record the profile name, proxy label, expected country, protocol, and renewal date so another operator can reproduce the setup.
- Proxy check fails: verify order status, IPv4 host, port, protocol, login, and password
- Outgoing country is wrong: review the selected IPNut country or region before changing browser settings
- Profile opens but WebRTC exposes another route: use SOCKS5 with confirmed UDP support or disable WebRTC when the task does not need it
- Profile changes country unexpectedly: review the proxy product and the Block on proxy country change rule
- Several profiles share one endpoint by mistake: select Saved proxies and filter for unassigned routes
- A VPN extension changes the visible IP: remove it from the profile because it can override the configured proxy
Static and rotating proxies should not be treated as interchangeable. A static endpoint fits long-lived sessions that need the same network identity. A rotating endpoint fits tasks designed for controlled IP changes. Neither mode removes the need to follow platform rules, monitor account health, and keep browser signals coherent.
Promo codes for new users:
- SALE20 – 20% off all plans except Max
- SALE30 – 30% off the Max plan
FAQ
Can I use an IPNut IPv6 proxy in Afina Browser?
No. Afina currently supports IPv4 proxy routes, so select an IPNut IPv4 product for this integration.
Which IPNut fields go into Afina?
Use the protocol, host or IP, port, username, and password. Put a rotation link in Change IP URL only when the selected product provides one.
Should I choose HTTP or SOCKS5?
Match the protocol shown in the IPNut proxy record. Choose SOCKS5 with confirmed UDP support when the workflow requires WebRTC, QUIC/HTTP3, or WebTransport.
Does a successful proxy check guarantee that an account will not be challenged?
No. It confirms the network route, not the policy status of an account or the consistency of every browser and behavioral signal.